Introduction
.NET provides several ways to build APIs, including MVC Controllers and Minimal APIs. As projects grow, Minimal APIs can get messy, and MVC often leads to unnecessary boilerplate. FastEndpoints solves these issues by offering a clean, vertical-slice approach called REPR (Request–Endpoint–Response) while delivering excellent performance.
What is REPR (Request – Endpoint – Response)?
The REPR pattern is at the heart of FastEndpoints. Here’s how it works, step by step:
- Request – Define what data comes in (like an ID, name, or any user input).
- Endpoint – Write what your API does with that data. This is where your business logic lives.
- Response – Specify what data goes back to the user (such as details about an item or a status message).
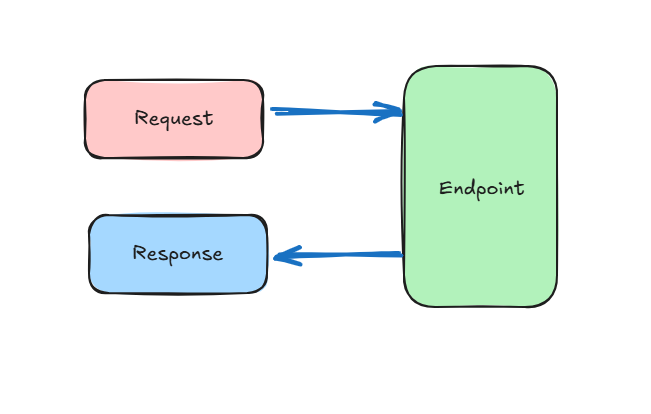
Every API feature in your project uses these three parts, making the code tidy, testable, and easy to understand—even for beginners.
Performance & Developer Experience
FastEndpoints delivers performance on par with Minimal APIs and is significantly faster than MVC Controllers—benchmarks show around 35k more requests per second than MVC.
Besides speed, FastEndpoints encourages maintainability, self-contained endpoints, less boilerplate, and easier code organization. This all leads to a better experience for developers at every level.

How to Set Up FastEndpoints
Setting up FastEndpoints is quick and simple. Follow these basic steps:
- Add the FastEndpoints NuGet package
dotnet add package FastEndpoints2. Register FastEndpoints in your app In Program.cs, add:
builder.Services.AddFastEndpoints();
app.UseFastEndpoints();3. (Optional) Set a global route prefix To use api as the prefix for all endpoints:
app.UseFastEndpoints(c => c.Endpoints.RoutePrefix = "api");That’s it; your project is ready for FastEndpoints! Now you can start adding endpoints using the REPR pattern.
Creating a Simple Endpoint
With FastEndpoints, you define each API endpoint as its own class that inherits from the Endpoint base class. Here’s a simple example that shows how to handle HTTP GET requests for fetching a customer by ID
public class GetCustomerByIdRequest
{
    public int CustomerId { get; set; }
}

public class GetCustomerByIdResponse
{
    public int CustomerId { get; set; }
    public string Name { get; set; }
    public string Email { get; set; }
}

public class GetCustomerByIdEndpoint : Endpoint<GetCustomerByIdRequest, GetCustomerByIdResponse>
{
    public override void Configure()
    {
        Get("api/customers/{CustomerId}");
        AllowAnonymous();
    }

    public override async Task HandleAsync(GetCustomerByIdRequest req, CancellationToken ct)
    {
        var customer = new GetCustomerByIdResponse
        {
            CustomerId = req.CustomerId,
            Name = "Jane Doe",
            Email = "jane.doe@example.com"
        };

        await SendAsync(customer);
    }
}How it works:
GetCustomerByIdRequest: Describes what data comes in (CustomerId).GetCustomerByIdResponse: Describes what data goes out (customer info).GetCustomerByIdEndpoint: Defines the route, accepts the request, processes it, and sends back the response—all in one place.
A closer look at the key methods
Configure()
- This method sets up your endpoint. Here you define the HTTP method (like GET), the route (URL), and any settings such as whether login is needed.
Example:
public override void Configure()
{
    Get("api/customers/{CustomerId}");
    AllowAnonymous();
}
This sets up a GET endpoint at /api/customers/{CustomerId} that does not require login.
HandleAsync()
- This is where your main logic lives. It runs every time someone makes a request to your endpoint. You use it to process the request, fetch or update data, and prepare the response.
SendAsync()
Use this inside HandleAsync() to send the response back to the user.
await SendAsync(customer);This sends the customer info as the response.
Endpoint<GetCustomerByIdRequest, GetCustomerByIdResponse>
- This means the class acts like a mini API that takes a
GetCustomerByIdRequest(input from the user) and gives back aGetCustomerByIdResponse(the output/result).
This demonstrates the power of REPR: clear, self-contained code for each API feature.
Further developments - Best Practices
- Strongly typed DTOs: Define clear Request and Response classes for every endpoint.
- Vertical-slice organization: Keep each endpoint in its own file or folder for better maintainability.
- Global route prefix: Use
app.UseFastEndpoints(c => c.Endpoints.RoutePrefix = "api")for a clean API structure. - Validation: Integrate FluentValidation for automatic model checks.
- Processors: Use
IPreProcessor<T>andIPostProcessor<T>for cross-cutting concerns like logging and caching. - Security: Apply JWT, cookie authentication, or custom schemes; use
AllowAnonymous(),Roles(), orScopes()per endpoint as needed.
Demp Project
 csandun